by Sam Tackeff | Nov 18, 2009 | Asian, Books, Japanese, Pantry Staples, Quick and Easy, Soups
 This week one of those hokey “name 3 things you like to eat, 3 places you’ve lived, and forward it to everyone!!!” emails circulated throughout my friends, with one noted similarity between all of our responses: It seems that we all have a voracious passion for bacon. Clearly our love for bacon will unite us for all time in friendship, so that’s exciting. And really who can blame us? There is so much you can do with the product – one slice lends entire flavor to soups, served crisply with eggs it is a miracle, even covered in chocolate there is demand.
 At the bookstore we have been selling copies of “Zingerman’s Guide to Better Bacon”, a rousing tour of bacon’s history (which for $300 you can get yourself a pigskin bound copy), as well as the Bacon Cookbook, which should have a prominent place in every bacon lover’s kitchen. In an unscientific poll that I’ve conducted, those most likely to buy these books were in a sub-set group of customers of which I include myself: the “JPAB’s”, say it: “Jay-Pab’s” or “Jews passionate about Bacon”. Maybe being deprived of bacon as a child led to my obsession, but really I think it’s actually a mix of deprivation and a greater cultural legacy- we Jews have a penchant for perfect savory brunch food – lox, whitefish, chopped liver, cream cheese, bagels – it’s no wonder that bacon sneaks itself in somehow.
 (Photo Helen Rosner/Eat Me Daily)
I’m always looking for new ways to use bacon, and most recently stumbled across a miracle in my new Momofuku cookbook – Bacon Dashi. Dashi, a traditional japanese stock made of konbu (kelp), and bonito flakes (dried fish, which has been powdered), is a staple broth that can be used in a myriad of ways. In the Momofuku cookbook, (of which a brilliant review can be found at Eat Me Daily), David Chang substitutes more easily findable smoky bacon for bonito, to create of this ever useful base broth. I made a batch last week, and have been using it in everything.
Things to use Momofuku Bacon Dashi for:
:: As the liquid for any soup, stew, grain, rice, or polenta. ::
Or:
1. Bacon Dashi over “stuff”: Slice shiitake mushrooms and green onions (scallions) in a bowl, and some silken tofu if you have it. Ladle hot Bacon Dashi over the contents of the bowl. Sit. Drink with glee. You know, I haven’t tried this, but I bet if you were to crunch up some of those onion strings that people put in green bean casserole in the bowl as well – it would taste good too.
2. Bacon Dashi Miso Soup – use the Bacon Dashi in this perfect and easy recipe for miso soup from Maki of Just Hungry.
3. Quick Bacon and Cabbage soup: Chop one strip of thick cut bacon and cook over medium high heat in a large soup pot. Add in one chopped onion and three minced cloves of garlic, and cook for about 4 or 5 minutes until slightly tender. Add in one chopped carrot, and rip in three leaves of sage. (If you have a potato, cube it into really small pieces, and add it here). Add a tin of cannelini beans, or great northern beans. Cook for about two minutes, and add 6 cups of Bacon Dashi – or a mix of water and dashi if you don’t have enough bacon dashi because you have used most of your double batch in the past few days. Bring to a boil, then turn down the heat, cover, and simmer for 20 minutes. Add in a half head of cabbage, roughly chopped, and 1 tablespoon of white miso paste and simmer for 10-15 more minutes. Season with some pepper, and serve.
*If you don’t have white miso paste, you could just salt at the end, but it wont have that nice unctuousness and depth that the miso adds to the soup. Buy yourself a little tub, and use it!
Momofuku Bacon Dashi
from the Momofuku Cookbook
Makes 2 Quarts
Two 3-by-6-inch pieces konbu (kelp)
8 cups water
1/2 pound smoky bacon, preferably Benton’s
1. Rinse the konbu under running water, then combine it with the water in a medium saucepan. Bring the water to a simmer over medium heat and turn off the stove. Let steep for 10 minutes.
2. Remove the konbu from the pot and add the bacon. Bring to a boil, then turn the heat down so the water simmers gently. Simmer for 30 minutes.
3. Strain the bacon from the dashi, and chill the broth until the fat separates and hardens into a solid cap on top of it. Remove and discard the fat and use the dashi or store it. Bacon dashi will keep, covered, for a few days in the refrigerator.
*Notes: All Asian grocery stores and most health food stores will carry dried konbu (kelp), although increasingly it is found in the Japanese part of the “world” section of the American supermarket. As to the bacon, I used Niman ranch thick cut apple-wood smoked bacon, and it worked out just fine.
*Also, you can half this recipe, or if you are smart, double it.
*Also, you can eat the konbu for snack instead of throwing it out. I wouldn’t advocate the same with the boiled bacon.
Other people using Bacon Dashi in creative ways:
Anticiplate: Southern Style Shrimp ‘n Grits
Inuyaki: Bacon Agedashi Tofu
by Sam Tackeff | Nov 12, 2009 | Food Travel, Ingredients, Local stores, Pantry Staples, Soups
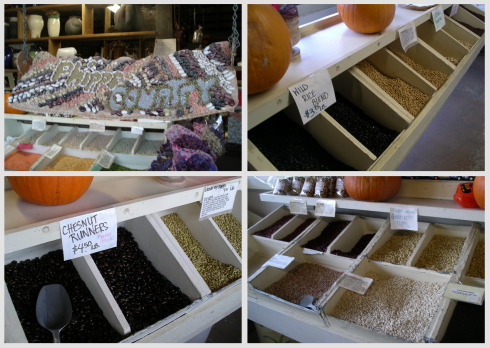
A few weeks ago we headed down the California coastline to a tiny town named Pescadero, on a quest for beans. Pescadero, at the midway point between San Francisco and Santa Cruz – is known for a lovely beach, antiques, the historic artichoke soup at Duarte’s Tavern (which apparently Guy Fieri is a fan of), and the burrito joint in the gas station – but if you drive farther down the road you will get to a mystical and magical place named Phipps Country Store, which has both an unusually large selection of beans, and an unusually large selection of birds, small furry animals, livestock and antique stoves.

So, truthfully, I drove over an hour just to buy beans. But, oh what beans!!! Phipps brags over 50 types of beans, most of which are grown by them, using no sprays/chemicals. While I was there I picked up some chickpeas, runner beans, soup mixes, and chestnut runners, all glorious stuff.
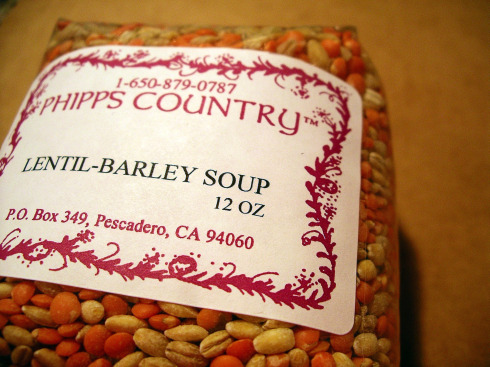
Included in my purchase was one really great package of red lentils and barley – that came with a recipe which I adapted for dinner.
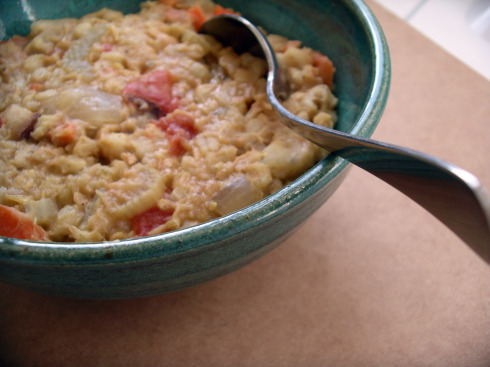
This soup is perfect for the winter weather, and like most soups, tastes absolutely delicious for lunch the next day even if you are eating it cold. My twist is the miso – I use white miso, which adds a really nice depth of flavor to soups without it tasting miso-y or exotic. You can easily find white miso paste in the refrigerator section of any asian market, and I would highly recommend buying it to have on hand. If you can’t find miso, you could substitute bouillon.
Phipp’s Red Lentil Barley Soup
makes 8-9 1 cup servings
1 slice thick cut bacon (I use Niman Ranch)
1 cup (or 1 large) onion, chopped
1 cup (or three stalks) celery, chopped
2 cloves garlic, minced
1 can (28 oz) tomatoes, or 4 cups diced fresh tomatoes
3/4 cups red lentils, rinsed
3/4 cup pearl barley
4 cups water
2 cups low sodium chicken broth
1 tablespoon white miso paste
1/2 teaspoon dried rosemary, crushed
1/2 teaspoon dried oregano, crushed
1/4 teaspoon ground black pepper
1 cup shredded swiss cheese, or sharp cheddar (optional)
In a large heavy bottomed soup pot, place the slice of bacon over medium heat, until most of the fat is rendered. Add in the onions, celery and garlic, and cook until tender, about 10 minutes.
Add the water, chicken broth, miso paste, tomatoes, lentils, barley, rosemary oregano, carrots and pepper. Bring to a boil, and then turn down the heat and simmer gently for 40 minutes or until the barley, lentils and carrots are tender. Top with swiss cheese or sharp cheddar if desired. (It goes well with or without!). I made a small batch of salt and olive oil rolls from my refrigerated master dough from “Artisan Bread in 5 minutes a day” and it went perfectly with this.
Nutritional Information: (Per 1 cup serving, not including cheese) Calories: 158, Total Fat: 1.6 g, Sodium: 115.9 mg, Total Carbs: 29.3 g, Dietary Fiber: 6.5 g, Protein: 7.7 g
Phipps Country Store and Farm
2700 Pescadero Road, Pescadero, CA 94060
(650) 879-0787
Hours: 10:00 – 5:00 during winter, Closed Mondays
by Sam Tackeff | Aug 6, 2009 | Ingredients, Italian, Pantry Staples, Quick and Easy
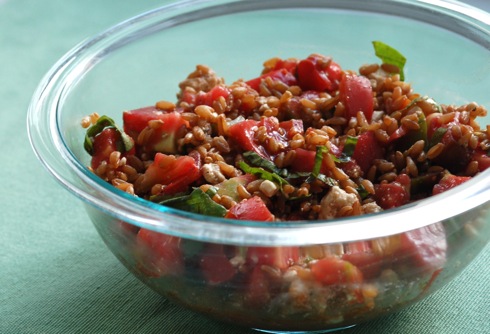
Farro is an interesting grain with a nice bite, that is well suited to easy summer salads. I use it in recipes that call for wheatberries, green lentils, bulgur or even barley occasionally as a replacement, but I find that I love it best in this salad with tomato, basil, feta, and a balsamic vinaigrette. I’m lucky to find farro at Rainbow Foods in San Francisco, but in some places, farro can be pricey – try shopping for it in stores with bulk bins, at trader joe’s, or even online.
Farro is an Italian word, and when I eat this grain, I find myself transported to Tuscany, sitting in the garden of my imaginary apartment, eating blissfully, drinking a glass of wine, and contemplating nothing but relaxation.
As usual, I use Mark Bittman’s pretty foolproof way of cooking most grains – put one cup of the grain in a small pot, and cover by at least an inch of liquid – bring to a boil, and turn down, cover, and simmer for 30-35 minutes without touching it. Then you can test it – if it’s not done, just add a few more tablespoons of liquid, and leave on the heat for ten more minutes. Unlike rice, don’t worry if there is extra liquid after the cooking time, just drain it.
MASTER RECIPE! Variations: This salad is also a great vehicle for crunchy vegetables – feel free to add fresh corn kernels (you don’t need to cook them!), black beans, bits of chopped red pepper, cucumber, shavings of carrot, chick peas, or even little cubes of summer squash to name just a few! Also, you can punch up the herbs with some fresh parsley or fresh mint (or both) to give it some extra green. No balsamic on hand? Just make a simple lemon vinaigrette with the same proportions of lemon to olive oil.
Farro Salad with Tomatoes, Basil, and Feta
serves 2 as a main, 4 as a side
Ingredients:
– 1 cup farro
– enough salted water or chicken broth to cover farro by one inch in pot (about 2.5 cups)
– 1 large heirloom tomato, chopped (ripe! uglier the better!)
– about ten leaves of basil, rolled into a cigar shape and chopped
– salt and pepper
– 2 ounces feta cheese
– 2 tablespoons balsamic vinegar
– 4 tablespoons extra virgin olive oil
Method:
1. In a medium saucepan, combine the farro and enough water (or chicken stock) to cover farro by an inch. Bring to a boil over high heat. Reduce the heat to medium-low, cover, and simmer until the farro is tender, about 35 minutes. Drain, and set aside.
2. In a large bowl, add the chopped tomatoes, basil, and feta, and cover with the slightly cooled farro. In a small bowl, whisk together the balsamic vinegar, salt, pepper, and olive oil to make a vinaigrette. Pour into the farro salad, and toss to coat. You can eat this warm, or it can be made in advance and popped in the refrigerator. Just let it come back to room temperature when you want to eat it, and make sure to re-toss it!
by Sam Tackeff | Jul 24, 2009 | Mexican, Pantry Staples, Soups

I’ve been working all week long in the bookstore (Omnivore Books on Food), while Celia, the owner is away in Paris (so jealous!), and find myself spending the entire day pouring through cookbooks and food memoirs, only to find myself hungry and a little exhausted by the time I get home for dinner.
While I don’t subscribe to the 30 minute meal mentality, I am enamored by recipes that take no more than 15 minutes to put together, and then cook on the stove for an hour or more with little to no fuss – enough time for really rich flavors to develop, and delicious aromas to perfume the house. I’ve been on a bit of a Mexican kick for the past few weeks, reading through our selection here in the shop, and came up with this Pozole – drawn from many sources and adapted for my own kitchen.
This is one of those great recipes where you need a big pot and a cutting board and really nothing else. It’s really a pantry recipe, and it’s basis is the hominy, which is made from maize but almost has the consistency of potato. Add the growers trinity (three sisters): beans, corn, and squash, and you have a delicious stew. They say what grows together goes together, and its certainly evident in this dish.
I get this started the moment I walk in the door, and then have a good amount of time to wind down, organize myself, read my email, and check in with my friends and family before dinner.
An Easy Pozole
serves 4
Ingredients
– 1 29 oz can white hominy
– 1 15 oz can white kidney beans (cannellini beans)
– A corn cob, kernels stripped, cob in the pot as well
– a 1/2 pound of green beans or romano beans, cut into 1 inch strips
– 4 or 5 pattypan squash, cubed
– Ham steak, cubed (the 1 inch thick prepackaged variety works fine)
– 1 onion, chopped
– 2 garlic cloves, smushed with your hand, or the flat of a heavy knife
– 1/2 teaspoon of dry marjoram (or a large sprig of fresh)
– 1/2 teaspoon dry oregano (or a large sprig of fresh)
– a teaspoon of chopped chile (or red pepper flakes)
– 3/4-1 Tbs. Cumin
– salt and pepper to season
Method
Add everything to a big pot, cover with water, to about an inch over everything, gently bring to a boil on medium high heat, and then turn heat down to medium low, cover loosely leaving the lid just a tiny bit ajar, and simmer an hour or more, stirring every once in a while, until you are too hungry to wait any longer. Take out the corn cob, and serve.
Serve with Lime and Cilantro, for garnish, and some warm tortillas for dipping.
Variations: Consider this a recipe that you can easily adjust based on what you have in the kitchen or on hand. I’d keep the onion and spices the same, but feel free to vary the amount of squash (any type of summer squash would do), and the types of beans, etc. You can pop in more vegetables if you’d like, such as chopped red pepper, tomato, or even leafy greens. You can also kick up the heat by adding more pepper – it’s really good hot!
by Sam Tackeff | Jul 2, 2009 | Pantry Staples, Seafood, Uncategorized
 I’ve been reading the Pioneer Woman religiously for several years now, and she is always reminding me of the beautiful things in life – love, the land, family, food, and friends.
Last month her friend Pastor Ryan of This is Reverb came to visit her, and made the most delicious looking shrimp risotto – I knew I had to try it. I had just purchased some beautiful asparagus at the farmers market, and decided to add that to the pot. This stuff is so incredibly good I can’t stand it.
Pastor Ryan is a hip, tattooed, man of god, with the most adorable daughter Ava Beans – he also happens to cook exactly how I want to cook – flavorful, painfully delicious food that is created without recipes, but with a basic foundation for your starting point and then just go! He’s been advocating Michael Ruhlman’s book Ratio – which is next on my to read list.
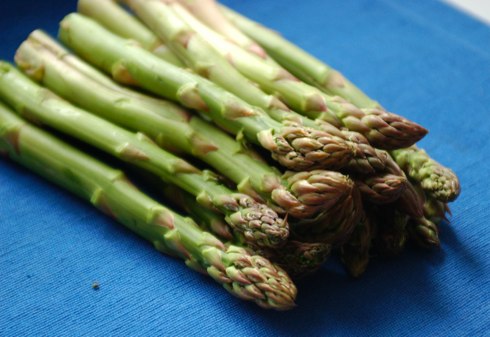 Aren’t they beauties? I was so excited to use them. A note on choosing asparagus: These were not too thick (sometimes the stalk gets really thick in late summer, in which case I would have used a vegetable peeler to peel them so that you aren’t trying to gnaw through the tough exterior), and the tips were tightly together, rather than splayed out or slimy or soggy which is a sign that they aren’t fresh.
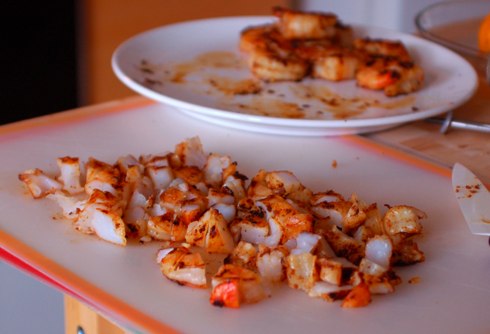
This dish seems labor intensive from the recipe, but don’t let it scare you. The entire process takes about 45 minutes from start to finish, and it just requires gentle coaxing and will reward you immensely.
Shrimp and Asparagus Risotto
adapted from Pastor Ryan of This is Reverb
serves 2 (plus one lucky person for lunch)
For the shrimp:
4 tablespoons unsalted butter (or salted)
several good glugs of worcestershire sauce
3 cloves of garlic
1 lb. peeled and deveined shrimp, ends removed
a lot of seasoning of your choice (lemon pepper, old bay)
For the risotto
a few good glugs of olive oil
1 large shallot, finely chopped
1 cup Arborio Rice
1/2 cup dry white wine
4 cups organic chicken broth
1 bunch asparagus, steamed, cut into inch long pieces
Method:
1. In a small pot, warm the butter on low heat, and add in the worcestershire sauce, and a few cloves of garlic. (I smushed ’em with the heavy side of my knife and then chopped them really finely before dumping them in.) Let that all mellow together on low while you peel the shrimp (and devein them – although I usually like to purchase them cleaned) – and then in a shallow bowl, spoon the sauce over the shrimp and let sit while you start your risotto.
2. In a heavy bottomed pot, sautee the large shallot in a few good glugs of olive oil. After a few minutes, throw in your arborio rice, and a half cup or more of white wine. Now this is a bit of a process – add your broth in, about a half cup at a time, stir, and let it cook down slowly (a few minutes each time) before adding the next half cup. – this whole process takes about 30 – 40 minutes or so – but don’t feel like you have to be stirring the whole time. (when you have about a cup of broth left, start back on the shrimp)
3. Shrimp, part two. Now that the flavors have been mellowing, heat up the grill. (Or in my case, a grill pan). Before puttting the shrimp on, toss in some of your favorite seasoning into the shrimp mixture – I used my grandmother’s super special seasoning mix – but lemon pepper or old bay would work absolutely fab here. Toss them onto the grill, and cook just a couple of minutes on each side. When done, chop up about three quarters of the shrimp, and save the rest whole for garnishing.
4. Steam the asparagus – just cut them into couple inch long pieces, put them in a pyrex in the microwave for five minutes with an inch of water and covered with a lid or some saran wrap.
5. Ok! Back to the risotto! I hope you have been stirring occasionally! Now add in your chopped shrimp, and your steamed asparagus – take a little taste – and season with some salt and pepper if it needs it. (The flavors from the shrimp should usually do it, but it might need just a tad more. Pastor Ryan adds in some green onions here… but I erm… don’t like them very much, so I omit them. I’m sure they would be good if you enjoy them though!
Serve, with the whole shrimp on top – man the stuff is good.
Thoughts – for next time – I think I might add in some chopped kielbasa – and you could theoretically do this with any seasonal vegetable you have and it would be pretty delicious. You could also do it with lobster I would think – that is if you are living on the east coast and it’s 5.99 a pound rather than more than double that here in California!
Thanks Pastor Ryan! Thanks Pioneer Woman!
For a foundation on cooking risotto, you can look at Ree’s post on Basic Risotto.
by Sam Tackeff | Jun 22, 2009 | Pantry Staples, Soups
 I went to the gym today.
I’ve been trying to drag myself in there for weeks.
I strolled in and screamed I NEED INCENTIVE! And so I got a free personal training session on the weight circuit and gave every muscle a moment to shine. It doesn’t hurt to have a cute trainer to get you really sweating. Huzzah! I’m feeling great that I’ve finally done it, and as I walked out of there, a woman walked briskly across the room and told me I had beautiful hair (and that was post gym hair!). I’m still beaming!
When I got back to the house, I was determined to continue my positive streak, so I put together this soup in about five minutes from some leftovers of Jamie Oliver’s Sticky carrots* that I had sitting in my fridge. You could just as easily boil some carrots with a little salt, pepper, and garlic, and make the soup in about 20 minutes from start to finish.
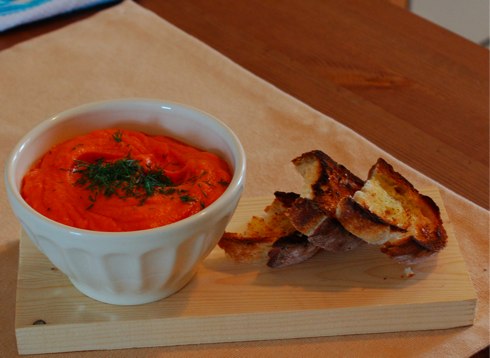
Quick Carrot Soup: In a blender, put a few cups of leftover cooked carrots (mine had salt and pepper already on them, but if yours don’t just add some), a half cup of plain yogurt, a half teaspoon of cumin, and a half teaspoon of turmeric, and a dash of water (or chicken stock if you have it), and blend until smooth. Top with some snips of dill.
Serve with garlic toast: just lightly coat a few pieces of day old bread with some good olive oil, put under the broiler or in the toaster for a couple of minutes, and then just lightly sweep a clove of garlic over the warm toast.
*Jamie’s Sticky Carrots: Cut a couple of pounds of carrots into two inch lengths, and stick them straight up in a small saucepan fitting them together snugly. Add a couple of Turkish bay leaves, salt and pepper, and a small nob of butter (a tablespoon or two) on top. (I add in a few cloves of garlic here, although his recipe doesn’t have them). Add enough water so that the carrots are halfway submerged, and bring to a boil. Simmer, covered, until carrots are cooked, about twenty minutes, and then just take off the lid and continue to cook until the water cooks down almost away, and the carrots get stick and lovely – about half an hour more. Jamie has you turn them out so they are all beautiful on the plate (taking care not to burn yourself), and serve.
 This week one of those hokey “name 3 things you like to eat, 3 places you’ve lived, and forward it to everyone!!!” emails circulated throughout my friends, with one noted similarity between all of our responses: It seems that we all have a voracious passion for bacon. Clearly our love for bacon will unite us for all time in friendship, so that’s exciting. And really who can blame us? There is so much you can do with the product – one slice lends entire flavor to soups, served crisply with eggs it is a miracle, even covered in chocolate there is demand.
 At the bookstore we have been selling copies of “Zingerman’s Guide to Better Bacon”, a rousing tour of bacon’s history (which for $300 you can get yourself a pigskin bound copy), as well as the Bacon Cookbook, which should have a prominent place in every bacon lover’s kitchen. In an unscientific poll that I’ve conducted, those most likely to buy these books were in a sub-set group of customers of which I include myself: the “JPAB’s”, say it: “Jay-Pab’s” or “Jews passionate about Bacon”. Maybe being deprived of bacon as a child led to my obsession, but really I think it’s actually a mix of deprivation and a greater cultural legacy- we Jews have a penchant for perfect savory brunch food – lox, whitefish, chopped liver, cream cheese, bagels – it’s no wonder that bacon sneaks itself in somehow.
 (Photo Helen Rosner/Eat Me Daily)


 I’ve been reading the
  Aren’t they beauties? I was so excited to use them. A note on choosing asparagus: These were not too thick (sometimes the stalk gets really thick in late summer, in which case I would have used a vegetable peeler to peel them so that you aren’t trying to gnaw through the tough exterior), and the tips were tightly together, rather than splayed out or slimy or soggy which is a sign that they aren’t fresh.
 I went to the gym today.