by Sam Tackeff | Jun 1, 2009 | Local stores

There is nothing like spending a few minutes a day in your neighborhood markets finding the perfect food for dinner. I know that many people have stressful days and they just want to get home and kick back with some takeout, or whatever you can make the fastest, but for me, spending a couple of minutes in the cheese shop making small talk and getting free samples, picking up some meat at Drewes and saying hi to the staff who know us by name, or walking down the street to Church Produce to find the perfect heirloom tomato and chat with my neighbors for a few minutes – is a really great stress reducer.
Here are a few snapshots of my beautiful neighborhood yesterday – it was cloudy and gray, but that only makes the roses more brilliant! These beauties were at the very top of the hill on Noe street. Someone has a lovely green thumb – I think I need to leave them a note on their door letting them know how jealous I am of their roses. They make for great incentive walking the steep way from my house to 24th street.

Here is St. Paul’s church, I’m guessing it’s why they call it Church Street, and it’s pretty impressive. We snuck inside once during afternoon mass, and it’s just beautiful inside – Gothic arches, buttresses, and intricate stained glass. One of my favorite classes in college was a course about spirituality and architecture, and regardless of what you believe in, walking into a church like this is sure to make your heart soar.

When I have a house, I’m going to paint it gray and grow some of these flaming climbing flowers. Look at the pop!
It’s not hard to shop in the markets every day when you have such a beautiful walk to look forward to. And it sure beats shopping for an hour in the terrifying/overwhelming Safeway on 30th. And then you have the added bonus of the freshest of produce and ingredients. Win!
by Sam Tackeff | May 31, 2009 | Pantry Staples, Seafood, Soups

Can you see it there in the dark light? It’s some delicious Salsa Salmon with Brown Rice and a very quick Black Bean Soup, (I promise you). For some reason, the three (3) cameras in my home managed to fail last week all at once. I was cooking in the mid evening, and watching the sun slowly descend as I tried painstakingly to compose the shot and take some photos – oh, no battery – gah, wrong lens – wait! why won’t you take photo without flash – sometimes these are the things you have to deal with.
But let me tell you a bit about this stuff. It was goooood. Really, really, completely satisfyingly good. I might end up making it every week good. It’s something you can put together without much effort and most of it is hands off, if you have a little time to wait and let the flavors marinate.
The secret? Store bought salsa. About an hour before eating, I take my pieces of salmon out into a dish, and coat them with about a cup of salsa – I used Mrs. Renfro’s Habanero Mango Salsa- and shove it back into the refrigerator. This can sit here for an hour or more (more is better) and if you want, you can check it halfway or so and turn the fish over.
Then I get started on the brown rice. Brown rice is fickle. I’d give you an exact time of how long it takes to cook, but it seems to depend on a thousand variables that I can’t quite pin down. Usually I check Mark Bittman’s ‘How to Cook Everything’ to check up on grain cooking times. It usually takes me about an hour. When the brown rice is done, I turn off the heat, cover it with a cloth, put the lid back on, and get a start on the rest of the meal. I get the black bean soup started, and once it’s going, then take the salmon out and cook it- usually it takes about five minutes on each side on medium heat for how I like it (a little rare).
When everything is done, you can plate it, and serve it with the rest of the salsa from the jar.
Really Quick Black Bean Soup
serves 2 or 3 as a generous side
Ingredients
1 tablespoon olive oil
1 heart of leek, chopped (or small onion)
1 clove garlic, minced
1/2 tablespoon cumin
1 teaspoon oregano
1/4 teaspoon chile powder
1 large heirloom tomato, chopped
1 can black beans, undrained
salt and pepper
Method:
1. In a medium saucepan, heat olive oil over medium heat, and add leek (or onion) and garlic, and cook for about five minutes, stirring so they don’t brown.
2. Add the spices, and give a stir. Then add in your tomato and your beans, and let cook for ten minutes or so on medium heat, and season to taste.
It’s almost as easy as opening a red can of pre-made Goya black bean soup mix, except you know, it’s better for you.
by Sam Tackeff | May 27, 2009 | Baking, Cheese, Daring Bakers, Turkish

The technical details: The May Daring Bakers’ challenge was hosted by Linda of make life sweeter! and Courtney of Coco Cooks. They chose Apple Strudel from the recipe book Kaffeehaus: Exquisite Desserts from the Classic Cafés of Vienna, Budapest and Prague by Rick Rodgers. And many thanks of course to Lisa of La Mia Cucina and Ivonne of Cream Puffs in Venice.
The assignment: Strudel dough, filling of our choice. I knew I didn’t want apple filling, because, well, it just feels wrong to be eating apples in May, even though I now live in California, and I suppose I could get a nice, ripe, seasonally grown local apple if I looked hard enough.
So what did I choose? The Sigara Borek – a Turkish favorite of my childhood.
These things are crispy, fried, filled with white cheese and parsley, perfect for breakfast, an afternoon tea with guests, or to snack on while watching sports.
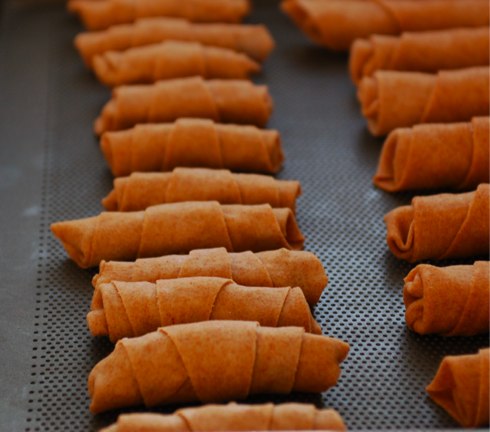
Mine are a bit of a bastardized version that ended up looking like dark fried wontons – because I had to use whole wheat bread flour instead of white, and then didn’t roll the stuff out as thin as I should have. The phyllo, or Yufka (Turkish phyllo) versions look a lot more golden. If you are going to make home made dough, it has to be done well in advance – the dough takes at least 90 minutes to sit.

The best part is that they can be made in advance, and then frozen – so you can pop them out and fry them in a little oil whenever you need them fresh.
But what if I’m looking after my health? Well, I also, in the spirit of Daring Bakers, tried a baked version, and another version which involves baking in water. Were they good you ask? As you can tell, neither of them are posted. So, that’s the beauty of freezing these guys, you can make three at a time, and not feel terrible about eating them all.

Sigara Borek
(makes a whole bunch, easily freezable)
Ingredients:
– a package of phyllo dough (or the Streudel Dough recipe below if you are up for a challenge)
– about 3/4 lb of white cheese (I use Bulgarian feta, or Valbreso the closest equivalents here in the states)
– a cup or more of freshly chopped parsley
– a little bit of water, for sealing the rolls
– vegetable oil, for panfrying
Method:
This works best as an assembly line:
1. Prepare the dough, by laying a flat sheet and cutting it into triangles (or if, you are rolling your own dough, roll it into a round shape, and cut out triangles like pizza slices).
2. Prepare filling: super easy! just mix the cheese and your really big handful of parsley together.
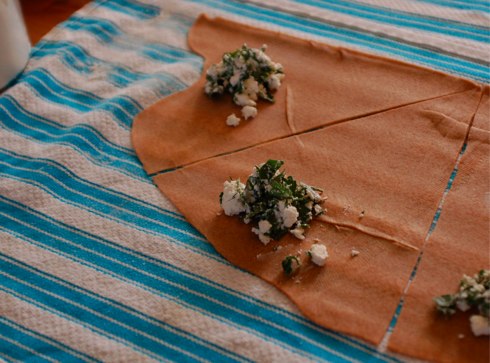
3. Spoon filling (about a heaping tablespoon) onto the wide end of the triangle (see my picture above), and then fold in the two sides, and roll up the end, using a little bit of water as glue to stick the end together. It’s easiest if you spoon the filling on a bunch of triangles and then roll them up one after another.
4. About here you can freeze the ones you aren’t going to be eating right away – freeze individually on a baking pan to keep them from sticking, and then once frozen, you can put them in a big ziplock together.
To eat: just fry for a few minutes in some vegetable oil, about a 1/4 inch deep on medium high heat, turning until all sides are golden brown (about 2-4 minutes). Note, if you use phyllo dough, they won’t have quite the bubble wonton look that mine do.
Home made dough:
from “Kaffeehaus – Exquisite Desserts from the Classic Cafés of Vienna, Budapest and Prague” by Rick Rodgers
1 1/3 cups (200 g) unbleached flour
1/8 teaspoon salt
7 tablespoons (105 ml) water, plus more if needed
2 tablespoons (30 ml) vegetable oil, plus additional for coating the dough
1/2 teaspoon cider vinegar
1. Combine the flour and salt in a stand-mixer fitted with the paddle attachment. Mix the water, oil and vinegar in a measuring cup. Add the water/oil mixture to the flour with the mixer on low speed. You will get a soft dough. Make sure it is not too dry, add a little more water if necessary. Take the dough out of the mixer. Change to the dough hook. Put the dough ball back in the mixer. Let the dough knead on medium until you get a soft dough ball with a somewhat rough surface.
2. Take the dough out of the mixer and continue kneading by hand on an unfloured work surface. Knead for about 2 minutes. Pick up the dough and throw it down hard onto your working surface occasionally. Shape the dough into a ball and transfer it to a plate. Oil the top of the dough ball lightly. Cover the ball tightly with plastic wrap. Allow to stand for 30-90 minutes (longer is better).
3. It would be best if you have a work area that you can walk around on all sides like a 36 inch (90 cm) round table or a work surface of 23 x 38 inches (60 x 100 cm). Cover your working area with table cloth, dust it with flour and rub it into the fabric. Put your dough ball in the middle and roll it out as much as you can. Pick the dough up by holding it by an edge. This way the weight of the dough and gravity can help stretching it as it hangs. Using the back of your hands to gently stretch and pull the dough. You can use your forearms to support it.
4. The dough will become too large to hold. Put it on your work surface. Leave the thicker edge of the dough to hang over the edge of the table. Place your hands underneath the dough and stretch and pull the dough thinner using the backs of your hands. Stretch and pull the dough until it’s about 2 feet (60 cm) wide and 3 feet (90 cm) long, it will be tissue-thin by this time. Cut away the thick dough around the edges with scissors. The dough is now ready to be filled.


