by Sam Tackeff | May 4, 2014 | Ingredients, Turkish, Vegetables

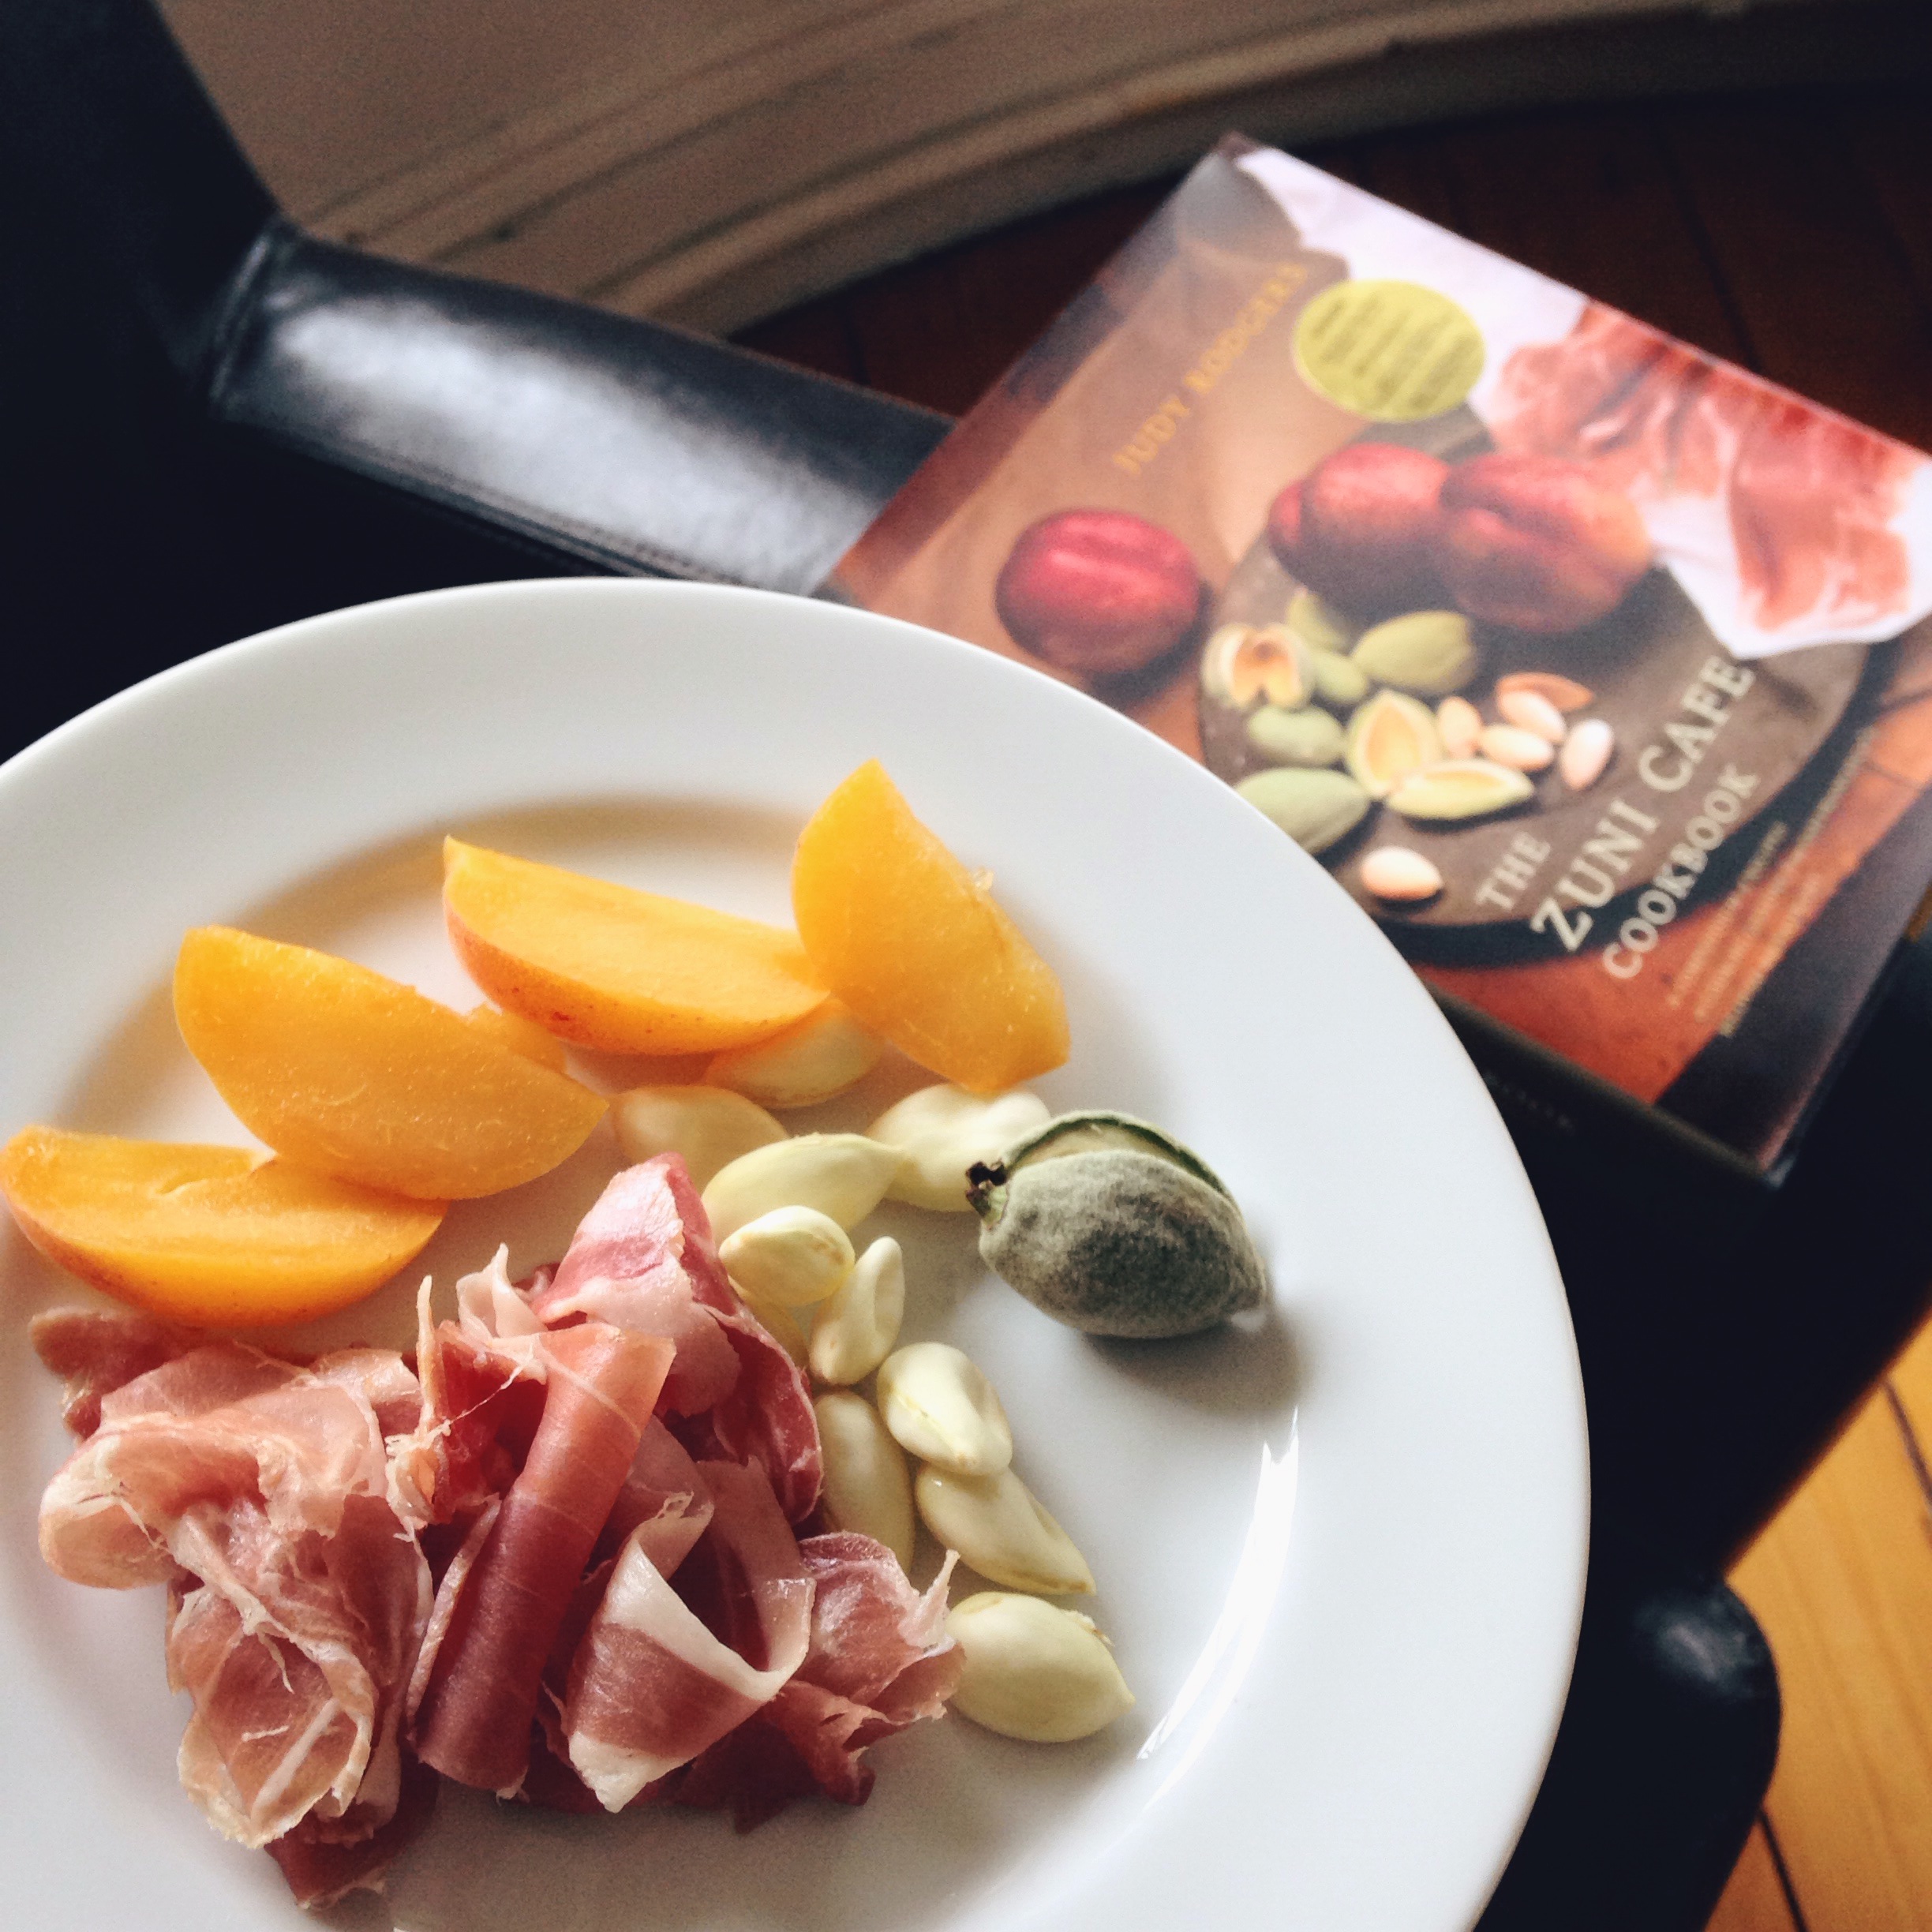
Yesterday at Formaggio Kitchen I noticed a basket full of green almonds, but passed them over while gorging myself on cheese samples because the $6/pound price tag made me cringe. Yes, they’re shipped from California, but boy is that a markup – in California you might see them for a few dollars a pound. Today I went back, with clearer perspective, to pick up a small bag for snack – some seasonal items with short windows are worth paying a premium for just in case you can’t find them somewhere else for cheaper before they’re gone.
Green almonds are tart fuzzy pods that contain almonds in their earliest stage of maturity– a springtime treat that you can often find in Middle Eastern markets. You can eat the pods whole doused with a little olive oil and salt, or you cut them open with a little paring knife down their center groove and eat the white almonds that haven’t yet hardened. The pods are crunchy, and filled with a clear citrusy jelly substance. Unlike the mature nut, they are soft, fresh and verdant – more plant-like than nutty in taste. In the Middle East, they are often pickled, sometimes fried, and sometimes featured in stews, such as the Persian Khorest-eh Chagaleh Badam, with beef, parsley, and mint. Usually, they are just eaten plain, accompanied by a cold beer, but also taste delicious sliced into spring salads.
Today I took a cue from the masterful Judy Rodgers in her Zuni Cafe Cookbook, and stole the pairing right off the cover photo: green almonds, stone fruit and prosciutto. If you happen to see these cheerful orbs, grab them quickly, before they are gone.
by Sam Tackeff | Jan 1, 2013 | chicken, Pantry Staples, Turkish

Why, hello! Has the first day of this new year treated you well?
Our celebrations were quite low key last night because we’ve both been a little under the weather. We started out with the movie Haywire, but despite my serious strong-girl crush on Gina Carano, the film committed the cardinal sin of bad action films: it was boring. So boring, in fact, that I turned it off after twenty minutes. We salvaged the evening with pizza, ice cream and several episodes of MI-5, and made it (reluctantly) until midnight.
Once we realized that the world wasn’t ending, we passed out and slept in until 10. Glorious!
Today we gathered ourselves and ventured out into the world. Devon needed snow boots, and I hadn’t left the house for a while. We drove to the L.L. Bean outlet, ate lunch at the salad bar at Whole Foods, and came back to work on a few new projects, draft some more resolutions, and think about my word of the year. For dinner, I thought I’d set us straight with some salads and roast chicken.
This is one of my favorite meals because it’s simple, light, and relatively foolproof. Which of course means that I had my first kitchen failure of the year – I started my chicken skin side down in my greased pan, but the skin decided to stick nearly entirely to the pan when I flipped it over. Alas! Good thing that rosemary and oregano infused chicken minus the skin still tastes good!

I topped my salad with some tomatoes, a few baby mozzarella balls, good black olives, and some rolled up slices of pastırma, a Turkish cured meat. I made a dressing with some of the pan drippings, some of the olive oil that I keep my black olives in, and a little bit of sherry vinegar. It was a solid start to the year!
After dinner, I grabbed all of our bones and put them in my little workhorse Crockpot to make a light stock overnight. I’ll probably use it for some soup lunches through the week. Nothing fancy, but you can never have enough chicken-water in the house. Meat tea!

To top it off, we had kazandibi, a sweet Turkish dessert which means “bottom of the pot” and features a lovely layer of caramelization over a rich thickened milk pudding. In Turkey, pudding is by far one of the most popular forms of dessert, and pudding shops are more ubiquitous than pastry shops.
I picked up a few of these at Sevan in Watertown, and since they aren’t the easiest to make well at home, they were a real treat. Traditionally you’d top them with a dusting of cinnamon and maybe some ground pistachios, but since I’m impatient, I ate it cold from the fridge with nothing on it.

After dinner, I set to work making one of my favorite kitchen resolutions happen: wash all dishes and wipe down counters before going to bed each night. Nothing like waking up in the morning to a clean kitchen and feeling ready to start the day on the right note!

Here’s to a wonderful new year ahead of us!
by Sam Tackeff | Sep 12, 2012 | Eggs, Turkish
Yesterday was a long day. I tried to avoid the television, but the tweets and messages and blogs of my friends remembering 11 years ago were sobering. I made the mistake of turning on NPR while in my car, and choking up while driving and listening to the short memorial stories.
And then I met my mom for a walk on the ocean. The air was the warm end of summer air, the sky was bright. The Atlantic was flat and deep blue, and seemingly endless. We talked about life, food, her first day of preschool. This walk – the same one we’ve gone on since I was a small child – always puts me in a better place.

Reluctantly, I came home again to an empty house, and although it’ll be the two of us again tonight, it was lonely. It was also late, and I was tired. My mom had given me several ripe tomatoes from her garden, and some fresh parsley, so I set to work putting together a riff on Turkish menemen – scrambled egg with peppers and tomato. Because I was pepper-less, I just added an extra tomato. I find that you can never eat too many tomatoes at the end of summer, because soon they’ll be gone, and you’ll regret your missed opportunities.

This is one of those dishes that I come back to again and again, the type of food that I eat alone. It’s dead simple, cooks up quickly, and works just as well for dinner as it would for breakfast. It also, for the record, tastes great when you come back at 2 am after a long night out.

Turkish Tomato Eggs
serves 1
1 tablespoon olive oil (or 2!)
2 or 3 ripe tomatoes, chopped or grated
salt
pinch of chile flakes (Such as Urfa Biber or Piment D’espelette)
pinch of thyme
3 large eggs, whisked
small handful of chopped parsley
In a non-stick skillet over medium heat, pour a generous amount of olive oil (a tablespoon or more if you can rationalize it). Add the chopped tomatoes to the pan, and season with a little bit of salt, a large pinch of chile flakes, and a small pinch of thyme. Stir, and let it bubble for three to five minutes.
In a bowl, whisk three eggs with a small pinch of salt. Pour the egg mixture over the tomatoes, and let it set for a bit, and then stir gently for a few minutes. This dish is fairly soupy, and not dry, but you are looking to cook the whites. When cooked, add a large handful of chopped parsley, and eat right away.
by Sam Tackeff | Aug 30, 2011 | Local stores, Restaurants, Sandwich, Turkish

Have you been in a convenience store lately? It used to be that you could only find sad packages of stale sunflower seeds, Slim Jims, or half smushed Hostess snack packs, but not much else. You may have been able to buy your late night desperation pint of ice cream, but usually it wasn’t the good flavor. For decades, convenience stores weren’t filled with what one wanted, but rather what one, in a moment of irrationality, believed they needed.
Now I have certainly been grateful at times for the salvation of convenience stores: that Snickers bar in Fort Bragg after driving unintentionally three hours up the Pacific Coast Highway without having eaten all day, and the air conditioning in a Buttonwillow gas station when it was 120°F come to mind. But these experiences have been few and far between. It used to be that I wouldn’t stop in one unless I was truly desperate.
I am here to share that times are ‘a changing. In New England, a curious thing seems to be happening. This region has hopes and dreams for convenience stores, and is pushing for a small revolution. Taking it a new level. The ultra-convenience. Superlative convenience. Or more to the point, actually convenient. In New England, our convenience stores are marvelous and full of happy surprises. We have affectionate names for them too. Cumby’s anyone? Ours come with or without gas. And, some of them house restaurants.
Take, for instance, my latest experience: Turkish Kebab’s, located in Jay’s Newmarket Convenience.

Jay’s Convenience Store is actually a converted house. You can get your gas and your cigarettes and your six-packs, but what you really want to come for is the food. Real Turkish food. I’m not really sure which I would have found more unlikely a decade ago – having great food in a convenience store, or finding Turkish food in Newmarket, New Hampshire.
Turkish food is my comfort food, the food I crave. I grew up spending summers in Istanbul. We would visit the city where my grandmother lived, and then spend weeks on Büyükada, the biggest of the Princes’ Islands. The setting was idyllic: a beautiful island in the Bosphorus, with centuries old houses, no cars, and horse drawn carriages. You’d take your tea in the afternoon on the waterfront, watching the ferry boats come in from the city, their passengers visibly relaxing as they got off the boats. We’d swim, and bike, and walk through the neighborhoods. But mostly, we’d eat.
The street food culture in Turkey is diverse and enticing at every corner. There are Dönerci’s selling döner kebap – meat cooked on a rotating spit, and shaved thinly (similar to schwarma). You can get kebabs in sandwiches, or midye tava (fried mussels) with a nut sauce called tarator, or stuffed mussels taken straight from the Bosphorus and cooked on the sidewalk. Or you can get lahmacun, (lah-ma-joon) a thin Turkish flatbread with lamb, filled with lettuce and lemon, and wrapped up to eat on the go. There is Tost – which is the best grilled cheese you will ever eat, stuffed optionally with sucuk, a spicy sausage. Or if you need something sweet, there are pudding shops nearly everywhere, and more ice cream and waffle sellers than there are Starbucks in Manhattan.


I tend to feel sorry for myself that I live so far away from Turkey, especially in the summertime, so I was ecstatic to find Jay’s so close to home to fill myself up on the foods I was missing. I try to do a lot of Turkish cooking but you just can’t recreate döner without a large spit and a qualified chef. (It takes years of training to become a proper Dönerci).

Jay’s is filled with all sorts of treats that I crave. Kebabs – which loosely refers to almost any meat cooked on a stick – are their specialty. I’ve heard good things about their falafel, although I haven’t tried it. You can also get almost anything in sub form. They do Italian style subs as well, and some Italian home-style dishes.
They also have a large variety of Turkish salads, including Kısır, a bulgur wheat salad similar to Tabouli (they actually label it as Tabouli, but technically it is different), and hummus, and a very good eggplant salad. They have “popular” New England favorites including seafood salad, but why you would purchase that when you had Jay’s other options, I have no idea.
Turkish people also consume a lot of pastry and fried foods, and Jay’s carries many of these as well, including flaky Börek (turnovers) filled with white cheese and parsley, savory meat pies, zucchini fritters, and even some Italian arancini (rice balls) as big as your fist.

I was excited to hear the grocery section had a small collection of imported Turkish foods, because I always find myself missing things like Turkish honey, jams, and olive spreads. We typically travel over an hour to stock up on these things at Sevan in Watertown, Massachusetts, and I was looking forward to the.. erm.. close to home convenience.
Unfortunately, when we went, the entire Turkish grocery section in the back had been decimated. It turns out they had received a visit that week from a group of Turkish high-schoolers spending the month at Phillips Exeter Academy’s summer school. At least I can completely understand their impulse!
And apparently, students can also get a 15% discount on food if they show their ID. It’s probably better that they weren’t open when I was in highschool, otherwise I would have been in twice a week abusing their generosity.

This trip we all decided to order the same thing – thinly sliced döner in a Turkish lavash bread, rolled with lettuce, tomato, pickled onion, and yogurt sauce. While very tasty, I found myself finding the ratio a little off – there was actually too much meat for my preference, and I would have liked a little bit more sauce. Next time, I think I might actually get the tomato sauce their Italian cook makes rather than the more traditional yogurt. Nothing wrong with a little fusion!
We also took home some smoky Turkish eggplant salad, and some kisir, as well as some kadayif – a crispy pastry similar to baklava, except with vermicelli-like dough filled with pistachio nuts. (At some point, I’ll write a 5000 word essay on my love of Turkish pastry… the stuff is glorious.)
The one flaw of Jay’s is the lack of seating: when you are hungry, you want to eat food right away! Some quick thinking led us to the benches at Stratham Hill Park. And here, I leave you with a shot of my mother, a real live Turkish person, enjoying her sandwich. Authenticity folks, I like it.

Turkish Kebab’s Subs & Grill (in Jay’s Newmarket Convenient Store and Gas)
35 North Main Street, Newmarket, New Hampshire
603 – 659- 1500
by Sam Tackeff | May 27, 2009 | Baking, Cheese, Daring Bakers, Turkish

The technical details: The May Daring Bakers’ challenge was hosted by Linda of make life sweeter! and Courtney of Coco Cooks. They chose Apple Strudel from the recipe book Kaffeehaus: Exquisite Desserts from the Classic Cafés of Vienna, Budapest and Prague by Rick Rodgers. And many thanks of course to Lisa of La Mia Cucina and Ivonne of Cream Puffs in Venice.
The assignment: Strudel dough, filling of our choice. I knew I didn’t want apple filling, because, well, it just feels wrong to be eating apples in May, even though I now live in California, and I suppose I could get a nice, ripe, seasonally grown local apple if I looked hard enough.
So what did I choose? The Sigara Borek – a Turkish favorite of my childhood.
These things are crispy, fried, filled with white cheese and parsley, perfect for breakfast, an afternoon tea with guests, or to snack on while watching sports.
Mine are a bit of a bastardized version that ended up looking like dark fried wontons – because I had to use whole wheat bread flour instead of white, and then didn’t roll the stuff out as thin as I should have. The phyllo, or Yufka (Turkish phyllo) versions look a lot more golden. If you are going to make home made dough, it has to be done well in advance – the dough takes at least 90 minutes to sit.

The best part is that they can be made in advance, and then frozen – so you can pop them out and fry them in a little oil whenever you need them fresh.
But what if I’m looking after my health? Well, I also, in the spirit of Daring Bakers, tried a baked version, and another version which involves baking in water. Were they good you ask? As you can tell, neither of them are posted. So, that’s the beauty of freezing these guys, you can make three at a time, and not feel terrible about eating them all.

Sigara Borek
(makes a whole bunch, easily freezable)
Ingredients:
– a package of phyllo dough (or the Streudel Dough recipe below if you are up for a challenge)
– about 3/4 lb of white cheese (I use Bulgarian feta, or Valbreso the closest equivalents here in the states)
– a cup or more of freshly chopped parsley
– a little bit of water, for sealing the rolls
– vegetable oil, for panfrying
Method:
This works best as an assembly line:
1. Prepare the dough, by laying a flat sheet and cutting it into triangles (or if, you are rolling your own dough, roll it into a round shape, and cut out triangles like pizza slices).
2. Prepare filling: super easy! just mix the cheese and your really big handful of parsley together.
3. Spoon filling (about a heaping tablespoon) onto the wide end of the triangle (see my picture above), and then fold in the two sides, and roll up the end, using a little bit of water as glue to stick the end together. It’s easiest if you spoon the filling on a bunch of triangles and then roll them up one after another.
4. About here you can freeze the ones you aren’t going to be eating right away – freeze individually on a baking pan to keep them from sticking, and then once frozen, you can put them in a big ziplock together.
To eat: just fry for a few minutes in some vegetable oil, about a 1/4 inch deep on medium high heat, turning until all sides are golden brown (about 2-4 minutes). Note, if you use phyllo dough, they won’t have quite the bubble wonton look that mine do.
Home made dough:
from “Kaffeehaus – Exquisite Desserts from the Classic Cafés of Vienna, Budapest and Prague” by Rick Rodgers
1 1/3 cups (200 g) unbleached flour
1/8 teaspoon salt
7 tablespoons (105 ml) water, plus more if needed
2 tablespoons (30 ml) vegetable oil, plus additional for coating the dough
1/2 teaspoon cider vinegar
1. Combine the flour and salt in a stand-mixer fitted with the paddle attachment. Mix the water, oil and vinegar in a measuring cup. Add the water/oil mixture to the flour with the mixer on low speed. You will get a soft dough. Make sure it is not too dry, add a little more water if necessary. Take the dough out of the mixer. Change to the dough hook. Put the dough ball back in the mixer. Let the dough knead on medium until you get a soft dough ball with a somewhat rough surface.
2. Take the dough out of the mixer and continue kneading by hand on an unfloured work surface. Knead for about 2 minutes. Pick up the dough and throw it down hard onto your working surface occasionally. Shape the dough into a ball and transfer it to a plate. Oil the top of the dough ball lightly. Cover the ball tightly with plastic wrap. Allow to stand for 30-90 minutes (longer is better).
3. It would be best if you have a work area that you can walk around on all sides like a 36 inch (90 cm) round table or a work surface of 23 x 38 inches (60 x 100 cm). Cover your working area with table cloth, dust it with flour and rub it into the fabric. Put your dough ball in the middle and roll it out as much as you can. Pick the dough up by holding it by an edge. This way the weight of the dough and gravity can help stretching it as it hangs. Using the back of your hands to gently stretch and pull the dough. You can use your forearms to support it.
4. The dough will become too large to hold. Put it on your work surface. Leave the thicker edge of the dough to hang over the edge of the table. Place your hands underneath the dough and stretch and pull the dough thinner using the backs of your hands. Stretch and pull the dough until it’s about 2 feet (60 cm) wide and 3 feet (90 cm) long, it will be tissue-thin by this time. Cut away the thick dough around the edges with scissors. The dough is now ready to be filled.
by Sam Tackeff | Apr 8, 2009 | Farmers Market, Turkish
 Growing up, one of my favorite foods from my mother’s kitchen was the Dolma. Dolma in Turkish really refers to pretty much anything stuffed, rather than just the stuffed grape leaves it has become synonymous with in the States.
Some of my favorite dolma were her stuffed tomatoes, peppers and zucchini: vegetables from our garden ubiquitous in the summer time, that truly sang with a little bit of added filling. At home, my mother would make them with a traditional Turkish style filling of ground meat, rice, onion, chopped tomato, mint, dill, parsley, and toasted pine nuts.
After finding some spectacular peppers, and some Kokuho Rose brown rice this week at Alemany farmer’s market, I set about gathering ingredients for my dolma. I already had some left over cooked ground turkey that I had sauteed for a frittata filling that needed to be used up, and stuffed peppers seemed to be a natural receptacle for using up my leftovers. While these stuffed peppers don’t follow the traditional recipe, they are still incredibly delicious, and bring back so many good memories of home and excitement for the summer to come.
The best part about these stuffed peppers is that you can make them well in advance, and they taste equally good, if not better, the next day for lunch. And, they are the perfect size to pop two into a bento and have a filling lunch at work. Finally, in the spirit of adding as many vegetables to my diet as possible, I decided to add some roasted cherry tomatoes to the filling, and pop in a few extra scored tomatoes into the final dish to roast alongside my peppers. If you have any extra vegetables that need some cooking, this isn’t a bad dish to pop them in alongside.
 Roasted Tomato and Brown Rice Stuffed Peppers
serves two, with extra for lunch
2 cups cooked brown rice
1 cup cooked ground turkey (seasoned well with cumin, salt, pepper, chile powder)
1/2 onion
olive oil
2 cups cherry tomatoes
2 cloves of garlic
a few tablespoons of freshly torn basil
salt and pepper
4 red bell peppers
A good glug of balsamic vinegar
a few teaspoons of fresh thyme and oregano
olive oil
plain yogurt (optional)
Method:
Making the filling:
1. While brown rice is cooking, pop a few handfuls of cherry tomatoes in a pan with some olive oil, garlic cloves, salt, pepper, and freshly torn basil. Cook at about 300 degrees F, until the rice is done, about 40 minutes. They should get all jammy and delicious.
2. Right after popping the tomatoes in the oven, start the ground turkey, first sauteeing a half an onion in a little bit of olive oil for about 15 minutes until soft, and then adding the ground turkey, and cooking until well browned. Season with salt, pepper, cumin, and chili powder to taste. (I usually use about a teaspoon each of cumin and chile powder, but I like these with a little kick.
3. When the rice, tomatoes, and turkey are done, stir together in a bowl, and add a good glug of balsamic vinegar, and a few teaspoons of fresh thyme and oregano.
Assembling the peppers:
4. Preheat the oven to 400 degrees Fahrenheit. Line a deep baking tray or roasting tray with foil, and grease lightly.
5. Cut the peppers lengthwise, leaving the stem in place, but scooping out any seeds and excess white bits. For smaller peppers, feel free to lop off the top instead of cutting lengthwise. My mother bakes her peppers with the tops on, but I personally enjoy how the filling gets crisp on top when left uncovered. In a large baking pan lined with foil, place the peppers, season with a little salt, and pour on a little bit of olive oil.
6. Stuff the peppers with the mixture, place in the pan, and cover with foil, cook for 45 minutes at 400 F, uncover and cook for about 10 more minutes, or until top has lightly browned. Serve immediately, with a lemony herb salad. If you like, top with some plain yogurt – a very traditional Turkish accompaniment to this dish. I just spoon it over the top, it’s not fancy, it looks a little odd, but it tastes delicious. (It’s like the middle eastern equivalent to sour cream or mexican crema.)